Davis Weather Station Configuration Guide
Getting Started
Our team at Scientific Sales has put together this weather station setup guide, informed by decades of customer feedback and the latest product offerings. We hope it is a useful tool for determining the right product(s) for you, and for understanding the ways in which different products compliment each other. We are always available by phone or email to answer any questions, but this guide is an excellent place to start.
Your weather station configuration will revolve around the following considerations:
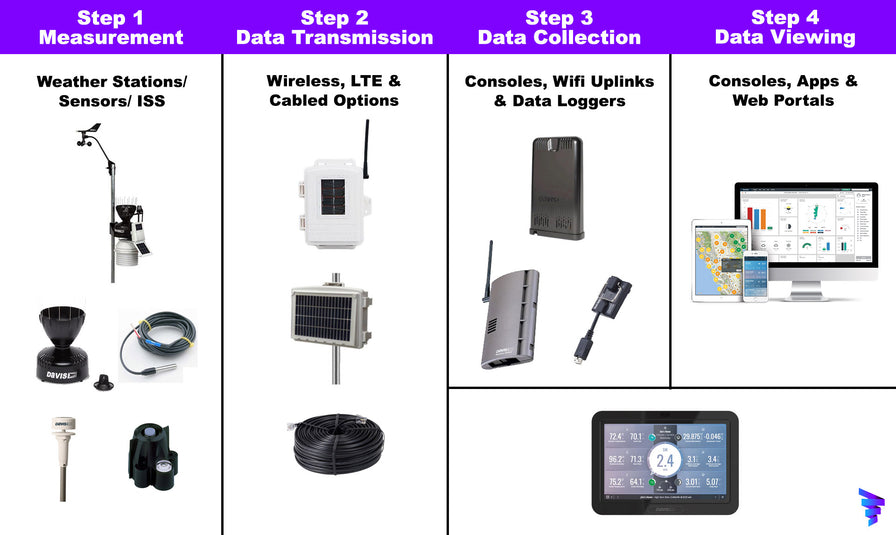
- The environmental measurements you would like to take & measurement accuracy. (Step 1)
- Your desired method of data transmission. (Step 2)
- Where you would like your weather measurement data to be available to view. (Step 3)
- How you would like to view and share your local weather data. (Step 4)
- Your intended weather station location, installation & mounting method. (Accessories)
- Price & Availability.
Let's make this simple.
Davis Instruments offers a huge selection of weather measurement, data transmission, data collection and viewing solutions.
To explain how these components work with each other, we've broken down our Weather Station Setup Guide into 4 steps.
We offer everything from complete solutions to all the individual components needed for custom setups.
Step 1:
Measurement
The first step of setting up a Davis Weather Station is deciding what kinds of environmental sensors you want. All Davis weather stations include sensors for Wind Speed, Wind Direction, Rainfall, Temperature, Humidity, and Barometric Pressure.
Additional sensors such as Solar Radiation, UV, Soil Moisture and Leaf Wetness are available with some systems, or separately as modular upgrades.
Upgraded sensors like the Ultrasonic Anemometer are available. Sensor accuracy enhancers, such as the Aerocone Rain Collector, and 12-Hour and 24-Hour Fan Aspirated Radiation Shields are also available.
Wind Speed & Direction:
The most common environmental measurements are wind speed & direction, captured by anemometers.
Standard: Integrated Wind Cups & Wind Vane, located on the body of the weather station. (Included with Vantage Vue Weather Stations.)
Upgraded: Remotely mountable Wind Cups & Wind Vane. (Included with all Vantage Pro2 Weather Stations.) or optional Ultrasonic Anemometer.
Rainfall:
Rainfall is commonly measured with a tipping spoon rain gauge, determining the volume and rate of rainfall in your area.
Standard: Integrated Tipping Spoon Rain Gauge (Included with Vantage Vue Weather Stations.)
Upgraded: Aerocone Rain Collector (Included with Vantage Pro2 Weather Stations.)
Temperature & Humidity
Temperature & Humidity Sensors are located within a Solar Radiation Shield, which insulates the sensors from the environment. The same way a car sitting in the sun will heat up more than the ambient temperature, a temperature sensor in direct sunlight will read a temperature warmer than it actually is. Radiation shields keep the temperature probe in the shade while allowing ambient air to reach the sensor. Similarly, a humidity sensor in stagnant air may accumulate moisture and read a higher humidity than the ambient air around it. Fan-aspiration helps circulate air over these sensors.
Passive: Non-Aspirated Radiation Shield (Included with Vantage Vue weather stations)
Standard: 12-Hour Daytime Fan-Aspirated Radiation Shield (Included with Vantage Pro2 weather stations.)
Upgraded: 24-Hour Fan-Aspirated Radiation Shield (Included with Vantage Pro2 Plus SPARS weather stations.)
Barometric Pressure
A barometer is included with all Davis weather stations.
Additional Sensors:
Solar Radiation Sensor
UV Sensor
Soil Moisture Sensor
Leaf Wetness Sensor
Step 2:
Data Transmission
There are two main ways to send your data from your weather station or environmental sensors.
Wireless:
Your weather data is sent every 2.5 seconds over multi-band radio frequency up to 1000' linear feet. This is ideal for simple home or business setups where the weather stations and their data receivers are a few hundred feet away at most. (Included with all Wireless Vantage Vue, Pro2 and Pro2 Plus weather stations.)
Cabled:
Your weather data is sent over data cable from your weather station to your data receiving device. This is ideal for permanent building mounted weather stations, or setups where a radio signal may have trouble reaching the data receiving device. (Example: Underground, RF Insulated or Thick Concrete structures.) All Davis weather stations with a "C" at the end of the part number are set up for Cabled installation.
Optional:
LTE:
Data can be transmitted to cell networks and available to view in the GroWeather App. Ideal for agricultural operations, very large properties or remote sensor suites. Weather stations can communicate this data Wirelessly or via Cable to an EnviroMonitor Gateway, then uploaded via cell connection. LTE data transmission devices require one time setup fees and annual service contracts.
Step 3:
Data Collecting
Your weather data can be received by a multitude of devices and available instantly or uploaded to your preferred data viewing platform.
WeatherLink Console: (Wireless)
The WeatherLink Console is a one stop option for collecting data, uploading data to your Wifi network, and viewing it instantly on the console's screen. It's an excellent option for personal, home, and business setups where real time monitoring on a console is preferred. Our most popular weather stations include this console as part of the package.
Wifi Uplink: (Wireless)
The Davis WeatherLink Live Uplink receives your weather station's wireless data transmission and instantly uploads it to the internet either over Wifi or ethernet connection.
Weather Envoy: (Wireless or Cabled)
The Weather Envoy receives either wireless or cabled data transmissions and communicates them to a 6510SER or 6510USB data logger.
Step 4:
Data Viewing
There are a few ways to view, customize and share your weather data.
WeatherLink.com:
View, analyze, and share weather data on the largest global network of personal weather stations. Build a custom weather dashboard of current conditions, analyze historical data in charts and in data exports. Best of all, you can create a WeatherLink.com account right now and check out the dashboard, and view recent conditions at Davis weather stations across the world. For faster refresh rates and advanced data features, Pro and Pro+ plans are available with a monthly subscription.
Console:
The WeatherLink Console displays real time weather data from your weather station, without a monthly subscription. This Console takes care of both Steps 3 and 4, and is currently the most popular way to receive and view your wireless weather data.
WeatherLink App:
When connected to the same Wifi network as your WeatherLink Console or WeatherLink Live, you can view real time weather data in your WeatherLink App. When travelling, you can access the WeatherLink global network. You do not need to own a Davis weather station to download and use the App.

Other Considerations
Internal Battery Power:
Wireless Vantage Pro2 weather stations are powered by solar panels with an internal backup battery, which you will likely never need to change. The Vantage Vue is also powered by solar power, however you may need to swap out the internal battery once every year or two. Keep this in mind if you intend to mount your weather station in a tough to reach location.
Solar Exposure:
You should factor in your local solar exposure when considering a wireless or cabled weather station, as this also designates how the station will get its power. If your location lacks regular direct sun, consider a cabled option.
Upgradability:
Vantage Pro2 and Pro2 Plus systems are customizable and will support additional sensors as you expand your environmental measurement. For example, it's okay to start out with the 6252 Vantage Pro2, then add Solar Radiation and UV sensors and a 24-Fan Aspirated Radiation Shield at a later date instead of buying a 6263 Vantage Pro2 Plus right away.
If you have any questions, give us a call at (609) 844-0055.
Accessories
Mounting:
Davis weather stations do not include mounting poles, but do include all the necessary mounting brackets. You can mount your weather station to any standard 1.00"- 1.75" diameter metal pole, or to the Mounting Pole Kit.
If you want your weather station freestanding, a Tripod Kit will work for soil and outdoor use, and the Tripod Kit with Lag Bolts is ideal for permanent installation on a concrete pad or rooftop.